

Introduction: So here's my new tutorial to explain this very tricky thing that is to encode a video for youtube with the less quality loss possible. As you may have noticed, the videos recorded by Fraps are extremely huge, such ~30Gb for an uncompressed .avi file.
This tutorial is made to help you to encode a video for youtube (fast upload of course) but not only, after encoding the original .avi file into H264 (.mp4) your video's size will be reduced from ~30Gb to ~500Mb only (depending the level of compression). So you can get rid of the heavy .avi and get back the place on your hard drive.
You will need several softwares:
Fraps: https://www.fraps.com/
A little but very mighty tool to record whatever is happening onto your screen. I guess you will hardly find a better one.
PM me to get the registered version.
Sony Vegas: https://www.sonycreativesoftware.com/vegaspro
For video montage. Note that this software costs over 500€. PM me for further informations. Make sure to download the right version (32 or 64bit) depending of your current operating system. Some other alternatives to Vegas may exist.
Once you got everything, you can check the next steps
Step 1: Recording with Fraps
Fraps is the tool that you will use to record your in-game sequences. Almost everybody here knows how Fraps is working. It's pretty simple actually but still, let's take a little view on how this should be set (for the best video quality)
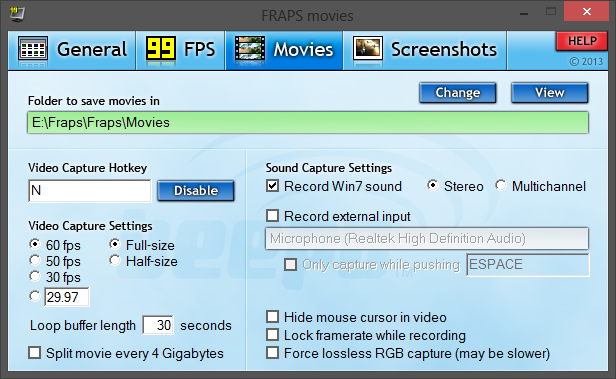
Only the "Movies" section is needed:
Firstly, set a directory where you want your videos to be recorded, make sure have got enough free space on the HDD/SSD you will select (at least 100Gb).
Then select your Video Capture Hotkey. This will obviously be the key you'll need to push to record a sequence. Make sure this key does not have a double function.
Now check the Video Capture Settings: It should already be set on "Full-Size" and "60 fps".
Note that if your computer doesn't handle it (huge performance loss when you start to record a sequence) you can set it to "Half-Size". If your computer is still not able to handle it, then... you have just lost your time reading my tutorial because you just CAN'T record anything at all(so don't read the rest!)
Over that, set the Sound Capture Settings as you wish, and don't touch the rest of the options.
You're ready to record, sir!
Step 2: Encoding with Sony Vegas
Sorry... I'm too lazy to explain how to build a videobut still, I will explain here how to export it!
So here we go: Once your movie is ready to be exported: Go to File and select "Render as"
Go onto the "render as" menu, make sure to select "Main Concept AAC/AVC" and "Internet HD 1080p".
Click on custom and follow those steps:
1: Write "60" to set your video at 60fps (as it's been recorded to 60 fps, we will export it at 60 fps aswell).
2: Uncheck this box (or not, that's up to you, after several tests I didn't notice any effect).
3: This'll have the biggest influence on your rendering quality. Set 50 000 000 (50 000 Kbps) for a good quality (note that bigger you'll set the bitrate, bigger the final file size will be).
4: Use the nVidia's CUDA (if available) for a perfect rendering without dirty pixels. Else, don't touch this field and it'll use the main CPU.
Don't forget to click on "Project" below and set the "Best" quality.
Rendered example:
Set 1080p 60Hz
Welcome to the GameZone24.net Forums - Serious Sam.
Results 1 to 10 of 10
-
21.08.2013, 19:57 #1Campers Clan


- Join Date
- January 2008
- Location
- Macrony
- Posts
- 12,649
Downloads: 60 Uploads: 5
[Tutorial] Record/Encode a video for youtube
Last edited by Skyward; 21.06.2016 at 11:25.

Corsair - Asus - Razer - Beyerdynamic
-
21.08.2013, 21:10 #2Knife to meet you!

- Join Date
- July 2013
- Posts
- 57
Downloads: 0 Uploads: 0
Why nothing for after effects? :3
-
22.08.2013, 03:42 #3Devils Clan

- Join Date
- July 2012
- Posts
- 2,606
Downloads: 66 Uploads: 0
I am wondering why Originally Posted by Bullsh0t


Pain in the ass


-
22.08.2013, 12:25 #4Campers Clan
- Join Date
- January 2008
- Location
- Macrony
- Posts
- 12,649
Downloads: 60 Uploads: 5
This tuto is not on how to mount a video, it's about how to record and encode while keeping the best rendering quality. Will be completed today

Corsair - Asus - Razer - Beyerdynamic
-
22.08.2013, 14:26 #5Knife to meet you!
- Join Date
- July 2013
- Posts
- 57
Downloads: 0 Uploads: 0
It's my program of choice Originally Posted by CLICK
-
22.08.2013, 16:01 #6Campers Clan
- Join Date
- January 2008
- Location
- Macrony
- Posts
- 12,649
Downloads: 60 Uploads: 5
updated 2/3.
Corsair - Asus - Razer - Beyerdynamic
-
23.08.2013, 17:28 #7Campers Clan
- Join Date
- January 2008
- Location
- Macrony
- Posts
- 12,649
Downloads: 60 Uploads: 5
Completed!

Corsair - Asus - Razer - Beyerdynamic
-
05.09.2013, 14:07 #8Campers Clan
- Join Date
- January 2008
- Location
- Macrony
- Posts
- 12,649
Downloads: 60 Uploads: 5
This is supposed to be the best bitrate settings for youtube... I guess if I encode to 50000kbps, the output file will be huge... to finally be destroyed again by this crap of youtube.. I'm still planning to test it though.

-
25.01.2014, 14:39 #9Campers Clan
- Join Date
- January 2008
- Location
- Macrony
- Posts
- 12,649
Downloads: 60 Uploads: 5
50000kbps tested, and the final rendering is amazing. More you'll set it high, more the file will be heavy but the quality will be better on youtube.
Though I tried higher values, the encode process seems to crash at some point.
Also:
if you record your video at 60fps, never encode it as double NTSC, because it's not proper 60fps it's 59.940fps. better manually set 60fps value in the field, otherwise it will tweak the rendering a little bit and the video will lose precision. Youtube automaticly converts the video to 30fps but better leave them to do it.Last edited by Skyward; 18.10.2014 at 12:53.
Corsair - Asus - Razer - Beyerdynamic
-
10.08.2015, 22:23 #10Campers Clan
- Join Date
- January 2008
- Location
- Macrony
- Posts
- 12,649
Downloads: 60 Uploads: 5
Updated 10/08/2015 - 23h 23m
Corsair - Asus - Razer - Beyerdynamic


 Reply With Quote
Thread Information
Users Browsing this Thread
There are currently 1 users browsing this thread. (0 members and 1 guests)
Similar Threads
-
first youtube video
By Duke Nukem in forum ChatterboxReplies: 5Last Post: 24.04.2014, 09:55 -
My new YouTube video - 15th September 2007
By Rodeschild in forum Multimedia ChatterboxReplies: 19Last Post: 18.02.2008, 18:40 -
YouTube video code
By Stifmeister in forum ChatterboxReplies: 8Last Post: 11.12.2006, 20:54 -
How do u record a demo?
By HPK in forum Serious Sam: The First & Second EncounterReplies: 13Last Post: 29.07.2004, 14:10
 Posting Permissions
Powered by vBulletin® Version 4.2.5
Copyright © 2024 vBulletin Solutions, Inc. All rights reserved.
Copyright © 2024 vBulletin Solutions, Inc. All rights reserved.
Shoutbox provided by
vBShout v6.2.18 (Lite) -
vBulletin Mods & Addons Copyright © 2024 DragonByte Technologies Ltd.
Copyright ? 2003 - 2020, GameZone24.net - Serious Sam Forums
Copyright ? 2003 - 2020, GameZone24.net - Serious Sam Forums
All times are GMT +1. The time now is 08:59.
vBulletin 4.0 skin by CompleteVB
